
Sections Menu
This guide book took some time to build. Any donation will be very much appreciated. Thank you.
Sections Menu
Section 1b
Section 1a
Section 1
Materials
When I first made these roses, 12 oz. soda cans were only available. Now, they do not sell a 12 oz. can separately. So, you have to buy a 16 oz. soda can individually. The 16 oz. can design of the flower is the same for the 12 oz. can.
-
- Two cans of Sprite
(16 oz.) (FIG. 1) - One can of Coke
(16 oz.) (FIG. 1)
- Two cans of Sprite


Section 2b
Section 2a
Section 2
Equipment
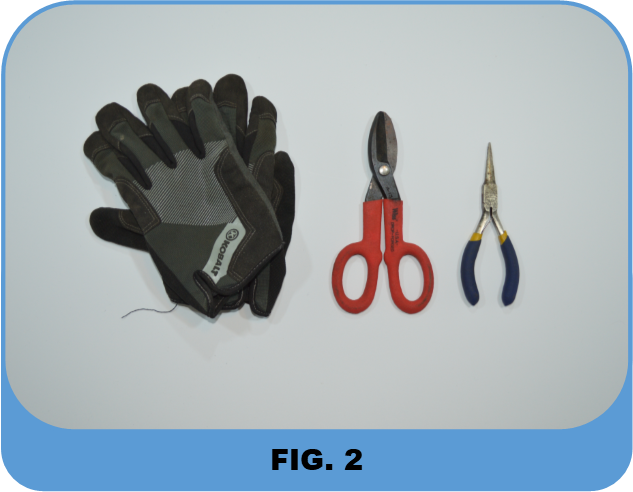
- One pair of gloves. Wear gloves because the tin will be very sharp once you make cuts into the soda cans (FIG 2).
- Tin cutters. This type of tool is made to be sharp. Use all safety recommendations from manufacturer (FIG 2).
- Needle nose pliers
(FIG 2). - One drying cloth.

Section 3b
Section 3a
Section 3
Preparation
- Empty the cans of soda.
- Rinse out the cans thoroughly so that no soda remains in can.
- Shake soda cans upside down to get as much water out of the cans.
- Make sure you do not break off any tabs.

Section 4b
Section 4a
Section 4
Rose Petal Cutting
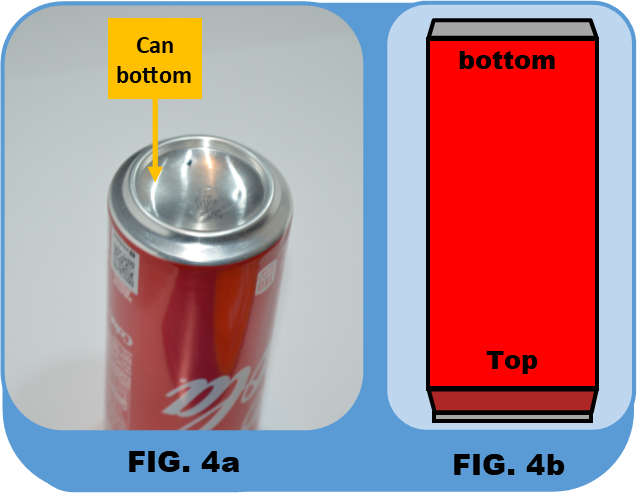
- Flip the red coke can upside down (FIG. 4a and FIG. 4b).
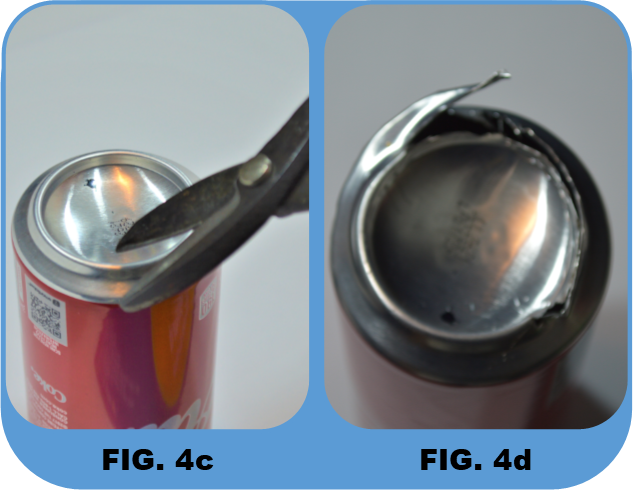
- Carefully, use the tin cutters to make a cut on the top round part. After a cut has been made, start cutting the top round part off (FIG. 4c). Cut enough off so you can maneuver the cutters to make a diagonal cut to the line that divides the red and silver tin
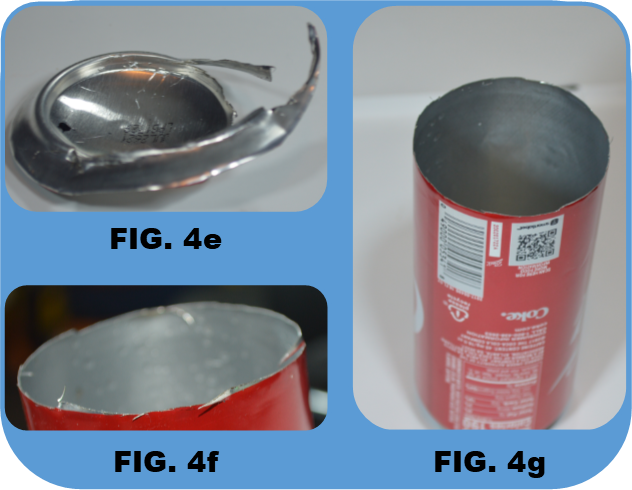
(FIG. 4d). Note: you might need to bend parts of the tin away so the cutters can fit better to make the diagonal cut. These parts are sharp so use caution. - Using the line where the two colors meet, cut all the silver off (FIG. 4e). You may trash or recycle this part of the silver tin.
- Make sure you go back and trim any sharp points off (FIG. 4f). Less sharp points the better
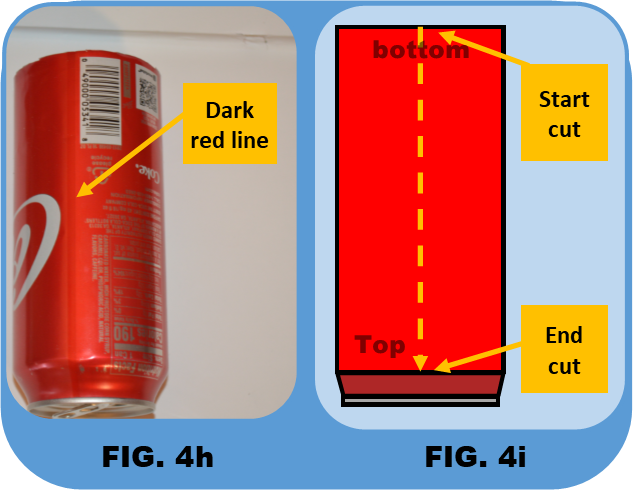
(FIG. 4g). - Locate the dark red line on the coke can (FIG. 4h).
- With the tin cutters, cut along the dark red line and stop cutting at the point the coke can starts to bend inward (FIG. 4i).
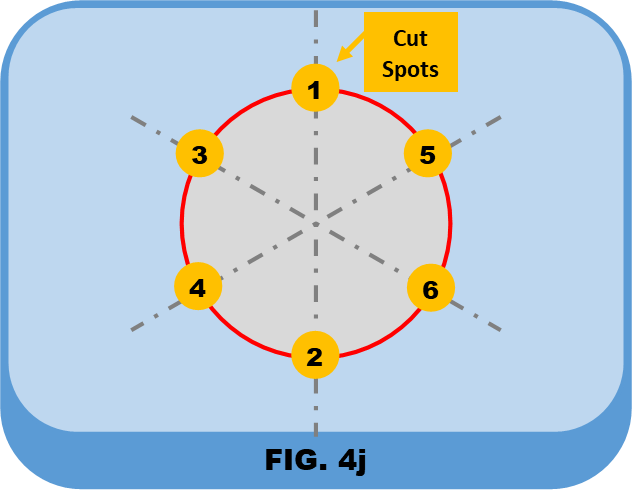
- Referring to FIG. 4j, make five more cuts at the cut spots as shown.
- Do not worry if the cut points are not evenly apart. Just make an estimate visually.
- Should have six long strips of tin. These will be your rose petals.
- At this point, try not to make any creases in the rose petals.


Section 5b
Section 5a
Section 5
Rose Petal Sizing
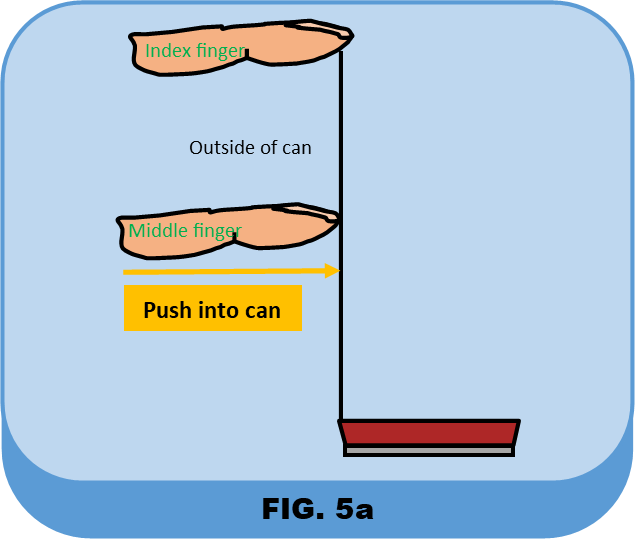
- Hold the top of the petal with your index finger. With your middle finger, bend the rose petal, at the point shown, by pushing the petal into the can (FIG. 5a).
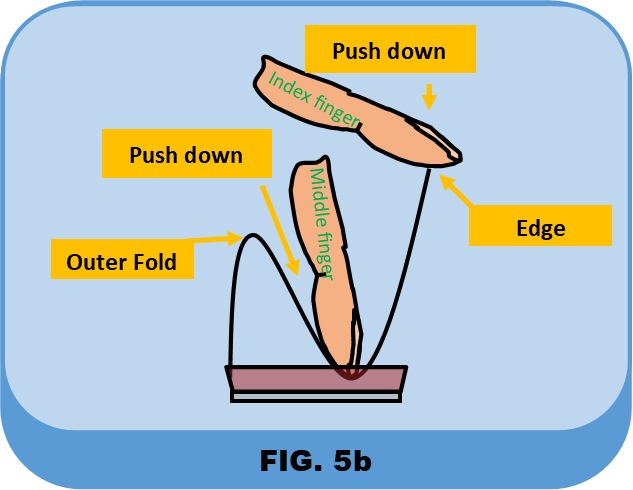
- At the point of middle finger, curl the petal down to the bottom of the can. Make sure the index finger is holding top of the petal up (FIG. 5b).
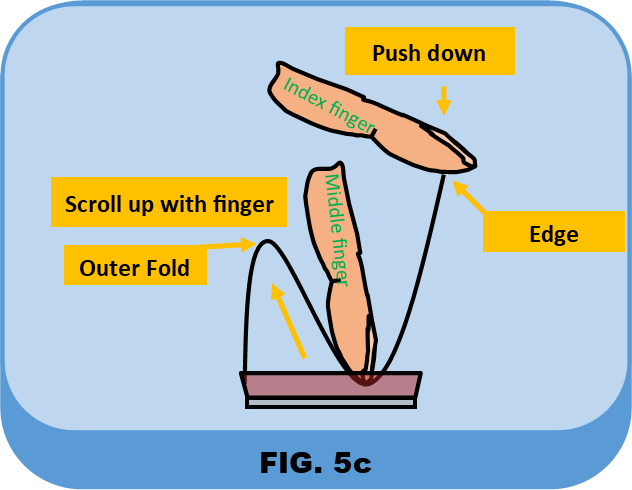
- You will now have an outer fold and an edge (FIG. 5b).
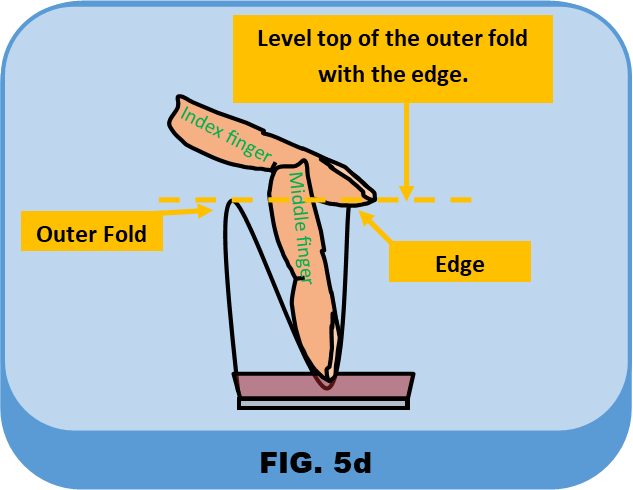
- Level the top of the outer fold with the edge. This is done by pushing the edge of the petal down with the index finger and moving the outer fold up by using a scrolling motion with the middle finger (FIG. 5c and FIG. 5d).
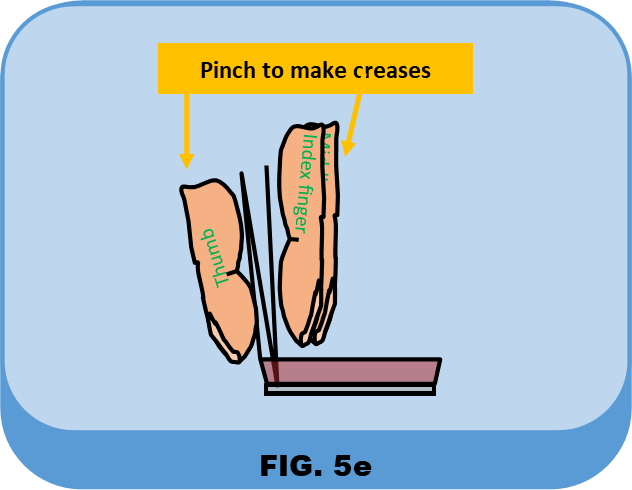
- Once you level the top of the outer fold and edge, create crimp the petal by pinching with thumb and two fingers (FIG. 5e).
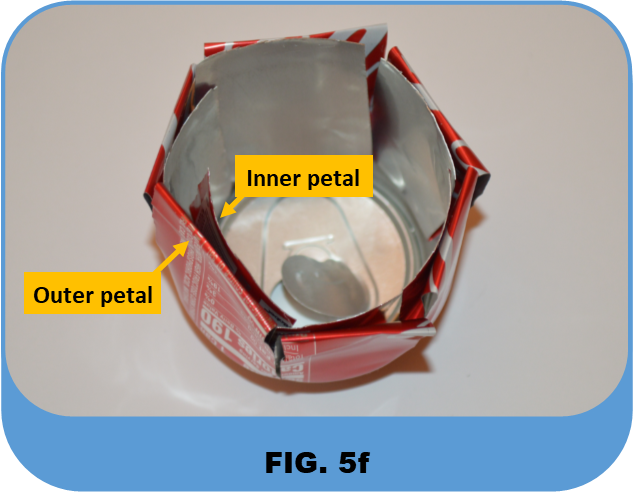
- Repeat steps 1-4 on all the petals (FIG. 5f).
- You will now have an outer petal and an inner petal (FIG. 5f).


Section 6b
Section 6a
Section 6
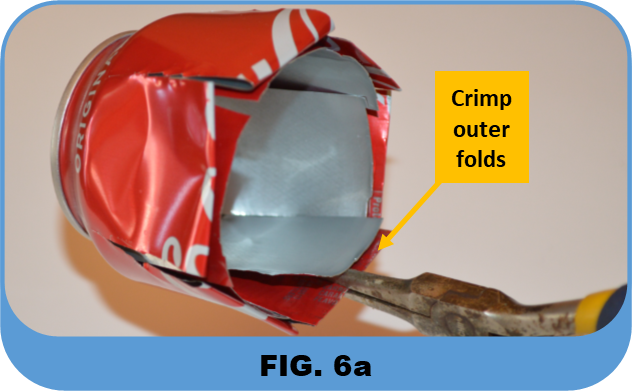
Rose Petal Shaping
- Crimp the outer petals with the needle nose pliers (FIG. 6a).
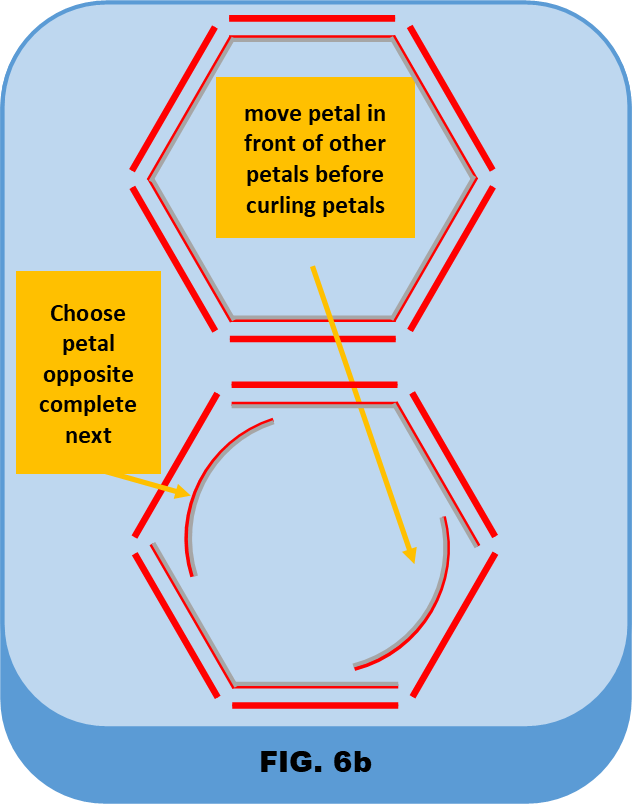
- Choose a petal and then move the whole petal in front of the left and right petals (FIG. 6b).
- Pinch the outer side edges of the inner petal so it curls inward. You will have to pinch all the way to the base to have the curl hold (FIG. 6b)
- Choose the petal directly opposite the first petal to repeat the process (FIG. 6b).
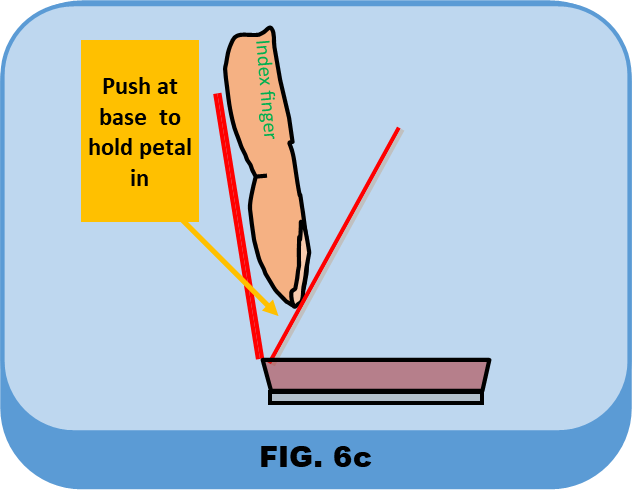
- Push down at the base of the inner petal so that the inner petal leans into the center of the flower (FIG. 6c).
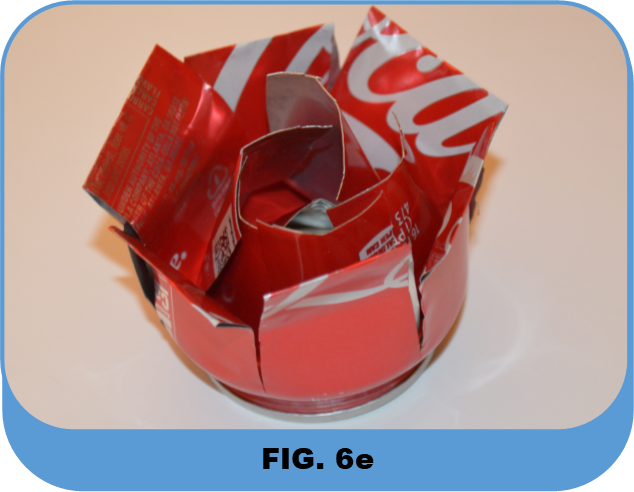
- Curl the outer petals outwards (FIG. 6d).
- You will have to move the petals front or back of other petals to get a pleasing shape. (FIG. 6e).


Section 7b
Section 7a
Section 7
Flower Base Cut
- Like the red coke can, cut the silver bottom off the green sprite can.
- Locate the dark green line (FIG. 7a).
- With the tin cutters, cut along the dark green line that ends at the silver lip (FIG. 7b).
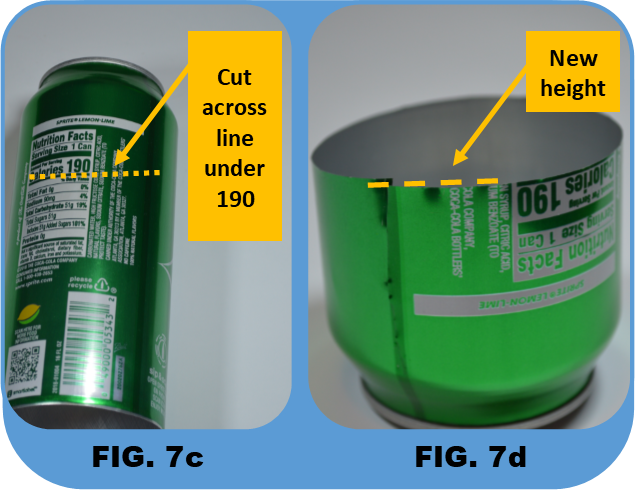
- Locate the line under the “190 Calories” (FIG. 7c). Use this line to cut all the way around the can with the tin cutters (FIG. 7d).
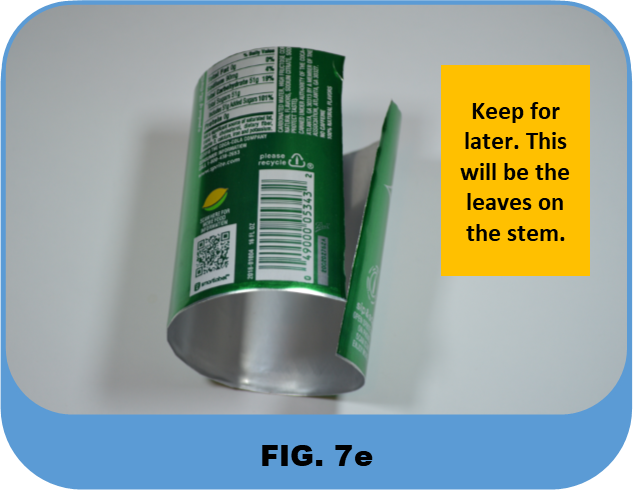
- Keep the piece that was just cut off. This will be the leaves on the stem (FIG. 7e).


Section 8b
Section 8a
Section 8
Flower Base Leaves
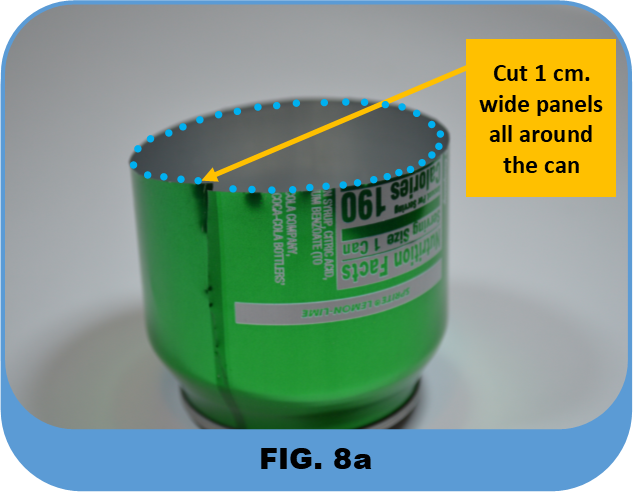
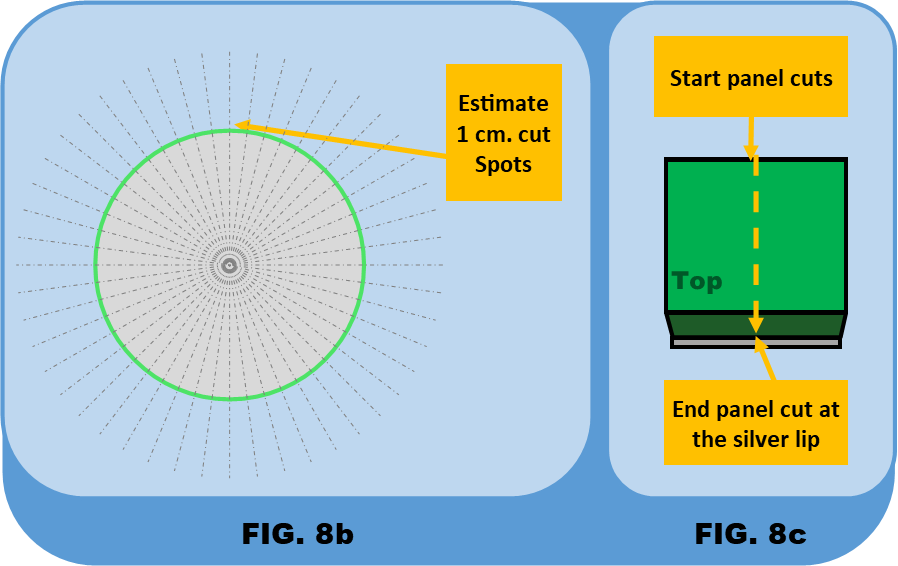
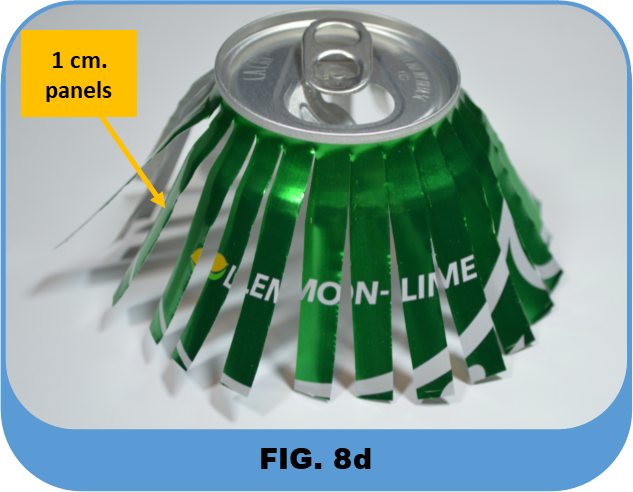
- With the tin cutters, cut 1 cm. wide panels all the way around the can. Just estimate the 1 cm. width of each panel. (FIG. 8a and FIG. 8b.).
- Each panel cut should end at the silver lip (FIG. 8c).
- The result should look similar to FIG. 8d.
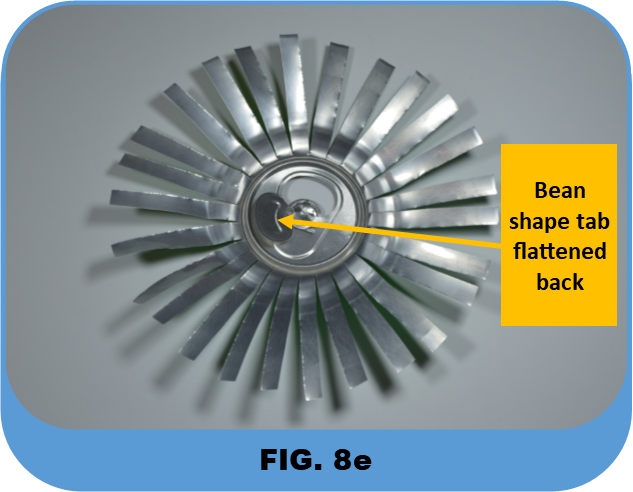
- Flatten the panels out. Flatten the bean shaped tap back (FIG. 8e).
- These panels will be the base leaves of the flower head.


Section 9b
Section 9a
Section 9
Connecting Base to Petals
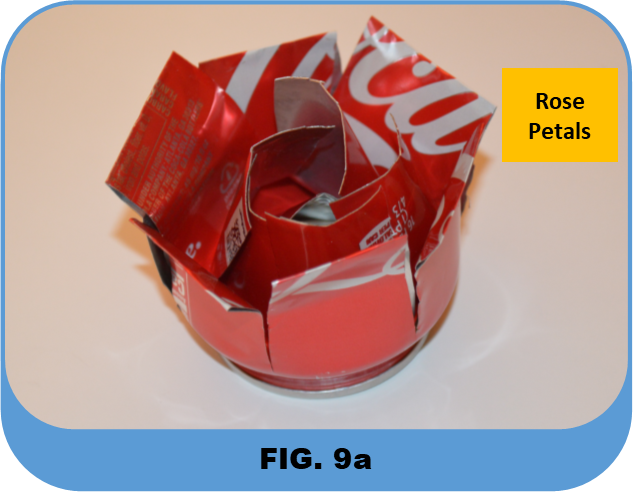
- Prepare to attach the base leaves (FIG. 9a) to the rose petals (FIG. 9b).
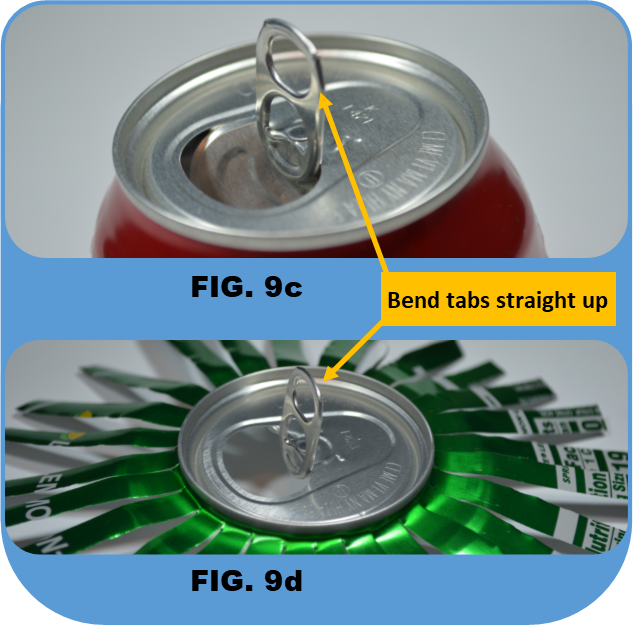
- On the rose petals, carefully bend the tab straight up (FIG. 9c).
- On the base, carefully bend the tab straight up (FIG. 9d).
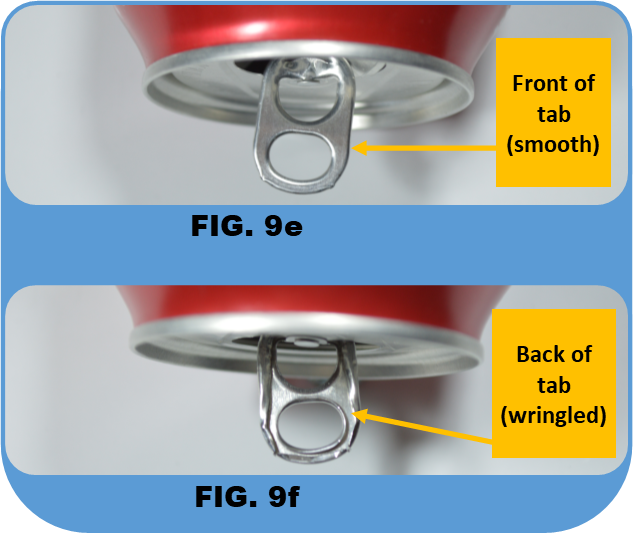
- The Tab Front is the smooth side of the tab (FIG. 9e) and the Tab Back is the “wrinkled” side of the tab (FIG. 9f).
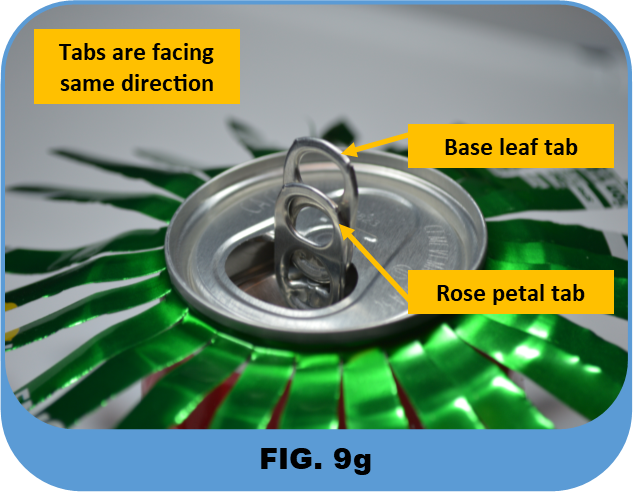
- Insert the tab on the rose petals into the drink hole of the base (FIG. 9g).
- Make sure the tabs are aligned in the same direction (FIG. 9g).
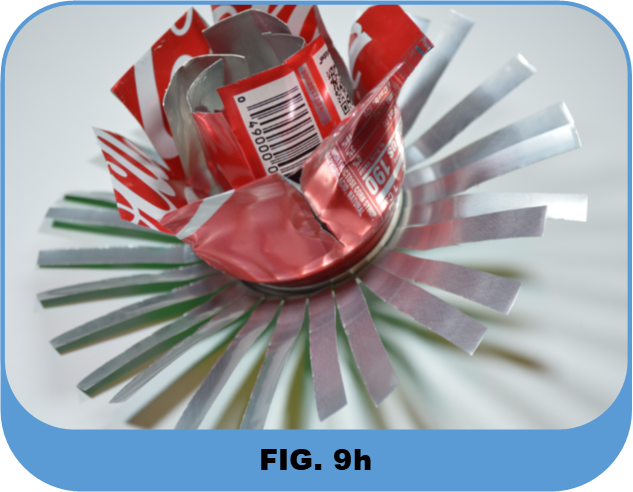
- Make sure result is similar as in FIG. 9h.


Section 10b
Section 10a
Section 10
Base Leaf Shaping
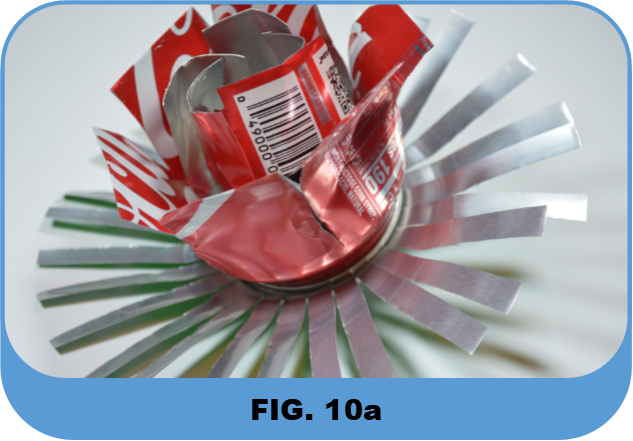
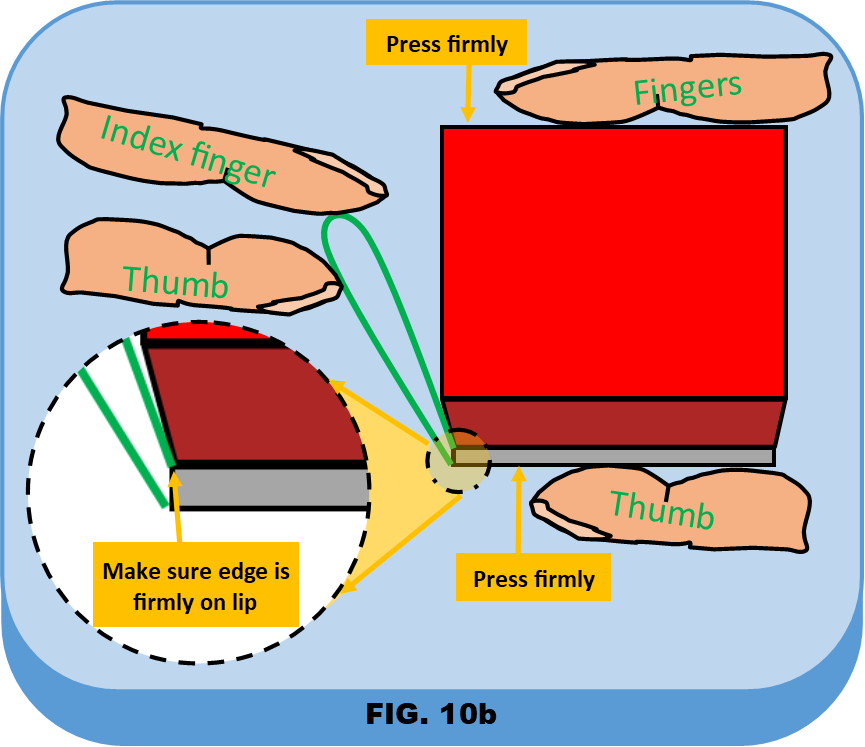
- With one hand, firmly press the base and the rose petals together. You should feel a soft snap (FIG. 10b). Hold firmly throughout the process once you begin curling the base leaves.
- Curl the base leaf so that the edge lays firmly on the silver lip on the base of the rose petals (FIG. 10b).
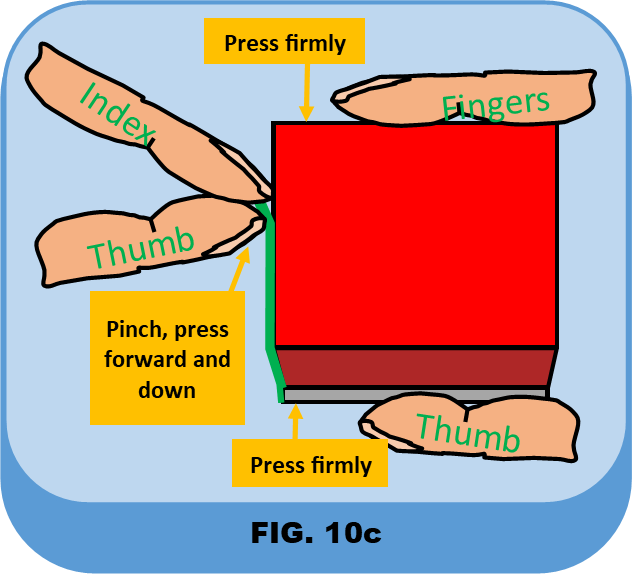
- With your index finger and your thump, pinch and press the base leaf against the rose petals (FIG. 10c). Make sure the edge stays firmly onto the silver lip of the base of the rose petals.
- Repeat each step with each base leaf, making sure the base and the rose petals are firmly pressed together until all base leaves are done (FIG. 10d).


Section 11b
Section 11a
Section 11
Creating Stem Pieces
- On the last Sprite can, cut off the silver bottom.
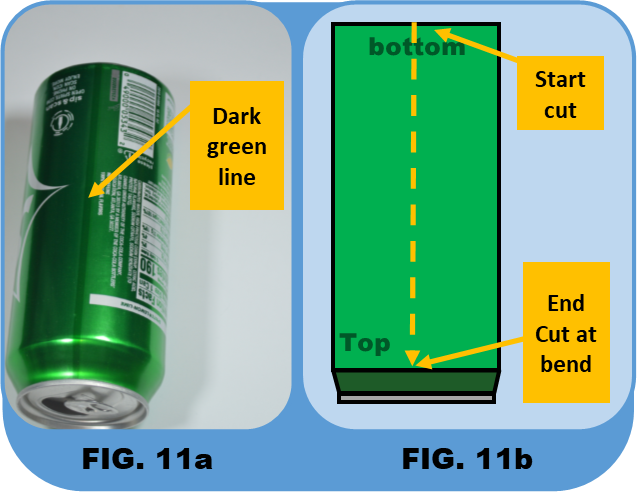
- Locate the dark green line on the Sprite can(FIG. 11a).
- With the tin cutters, cut along the dark green line to the point the Sprite can starts to bend inward (FIG. 11b).
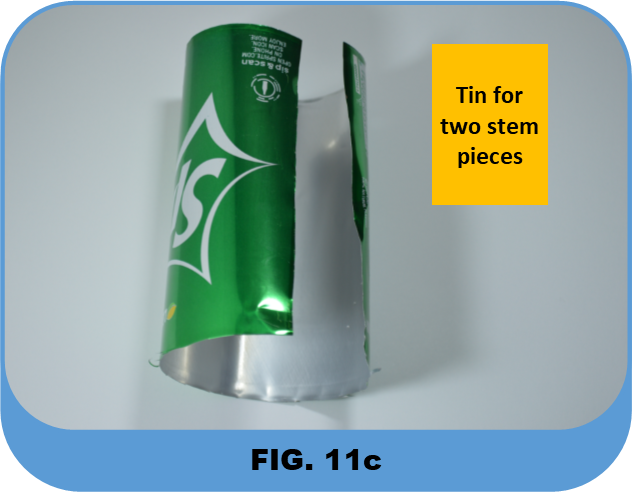
- Where the can starts to bend inward, make a perpendicular cut all the around the can until you have a rectangle sheet of tin (FIG. 11c).
- Caution: Do not make any crimps in the tin with your fingers. The tin is very sharp. Find the bottom of the tin. This is where you will make your first fold. Making sure the green side will show, you will start to make a 1/4 in. fold. It is easier if you have the tin laying on the table. Estimate where the 1/4 in. is and then fold the tin up from the middle and then make several more folds as you move towards to the outside edges. Once the tin has full length bend, flatten the fold over completely by pressing down. DO NOT flatten by sliding the tin sliding your fingers down the fold. The tin is very sharp. Use the needle nose pliers to crimp the full length of the fold (FIG. 11d).
- Using the exact width of the first fold, make a full length second fold (FIG. 11e), flatten and crimp.
- Make two more folds by repeating step 6 two more times.
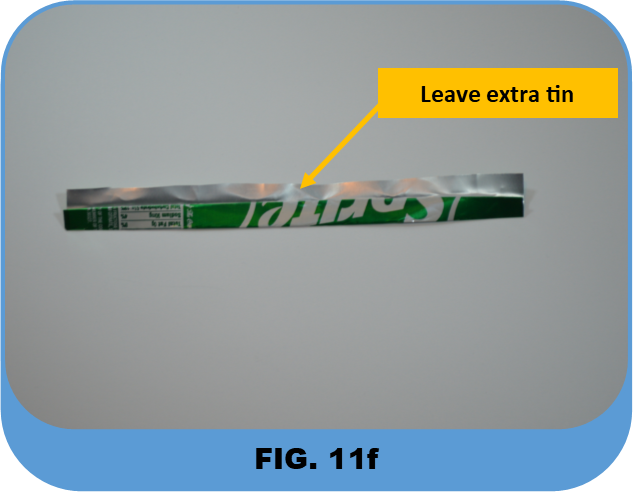
- Cut off the folded section while leaving extra silver tin the same width of the folded sections. Bend the extra tin up in a 90 degree angle (FIG. 11f).
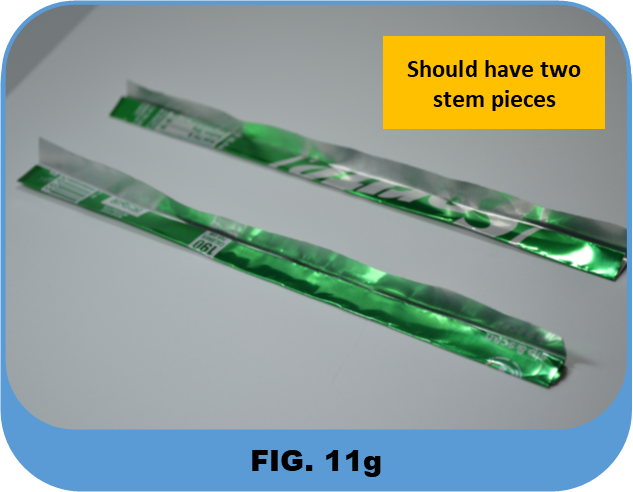
- With the piece of tin that was cut off, repeat steps 6-9. This will give you two pieces to make the stem (FIG. 11g).


Section 12b
Section 12a
Section 12
Creating Stem Leaf Pieces
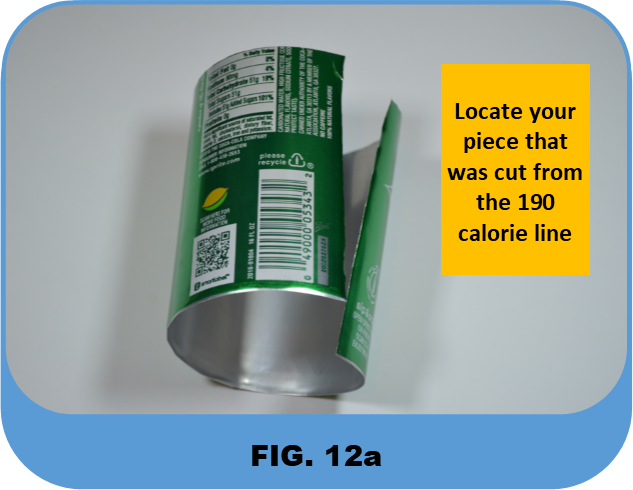
- Locate the tin piece that you cut from the first Sprite can at the 190 calories line (FIG 12a).
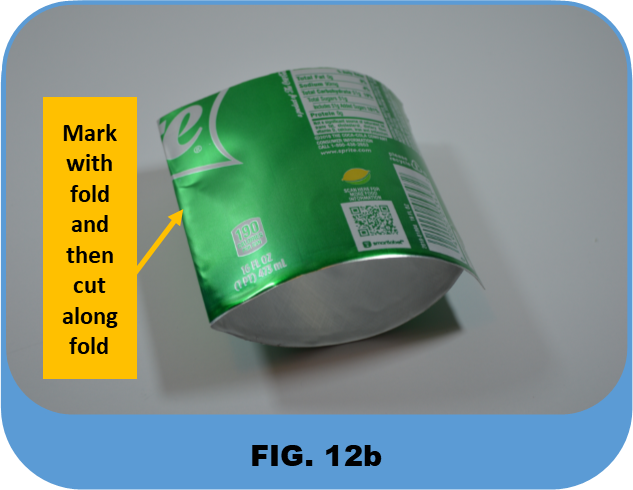
- Fold the tin in half so it leaves a fold mark (FIG. 12b).
- Use the tin cutters to cut along the fold line so now you will have two smaller pieces.
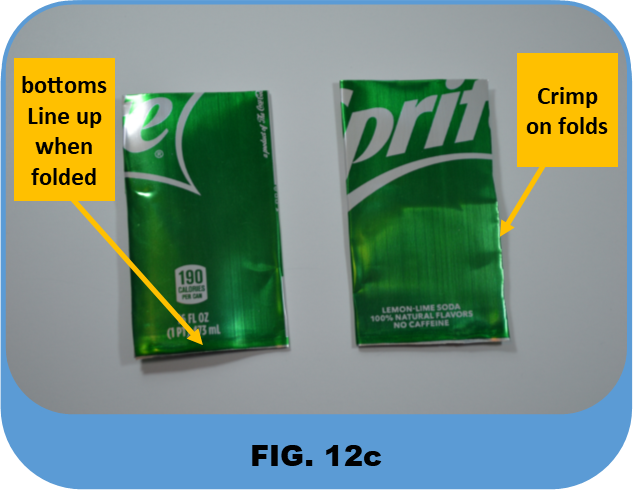
- Fold and crimp the two new pieces in half so their bottoms line up (FIG. 12c)
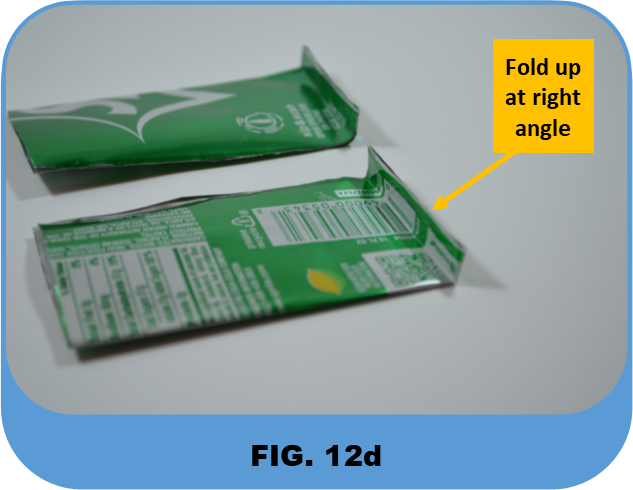
- At the bottom edge of each leaf, make a 1/4 in. bend at a 90 degree angle (FIG. 12d).
- These will be your stem leaves.


Section 13b
Section 13a
Section 13
Attaching Leaf to Stem
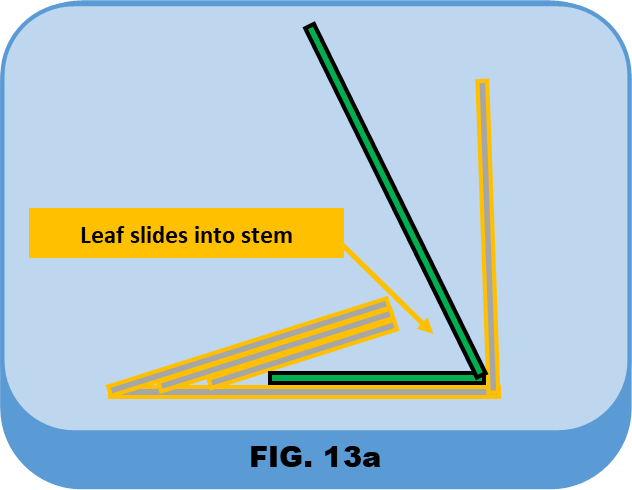
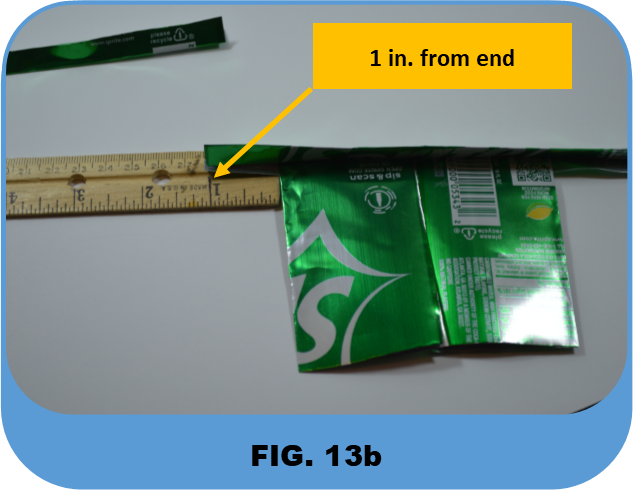
- Locate one of the two pieces made for the stem. Slide both leaves into that piece of stem. It will be easier to insert the leaf at the end of the stem piece and then slide the leaf up along inside the stem piece. (FIG 13a). Leave 1 in. from one end of the stem piece (FIG 13b).
- Slide the second stem piece 1 in. into bottom of first stem piece (FIG. 13c and FIG. 13d).
- Crimp the stem pieces down the full length of the stem (FIG. 13e).
- Fold and crimp the top leaf to face opposite the bottom leaf (FIG. 13e).
- With the tin cutters, cut a slit that is about 1/2 in. out from the stem and at about a 30 degrees angle on each side of the leaf. Cut the slit towards the stem. Do not make the cut too deep (FIG. 13f).
- Cut a small notch about 1/2 in. from where the two stem pieces are connected. Fold and crimp the notch to secure the stems pieces together (FIG. 13g).


Section 14b
Section 14a
Section 14
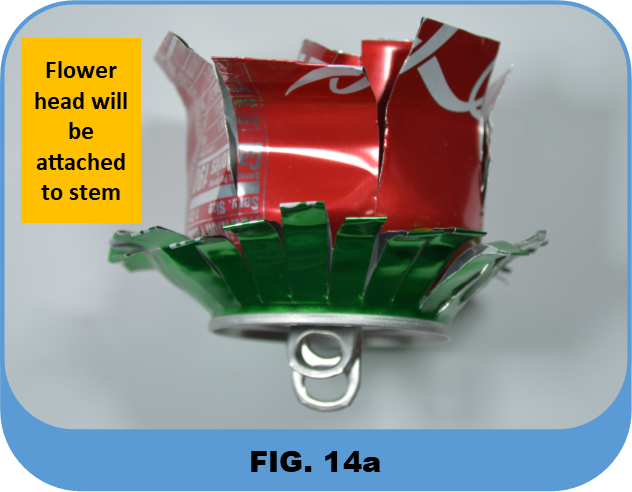
Attaching Stem to Flower Head
- The flower head (FIG. 14a) will be attached to the stem.
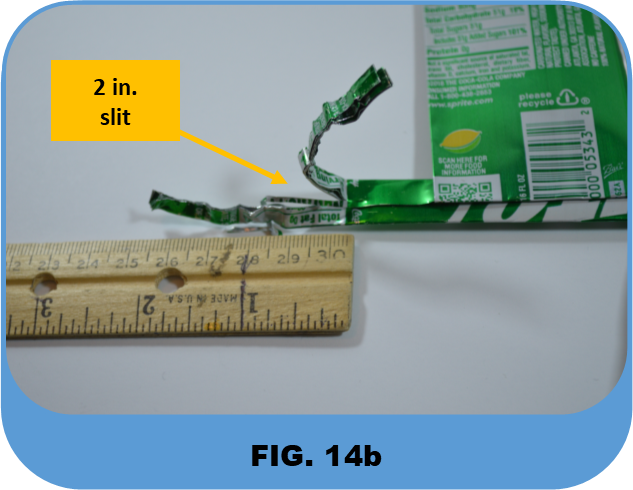
- On the top end of the stem, above the folded over leaf, make a 2 in. cut down from the edge. The cut should make a split that is half the width of the stem (FIG. 14b).
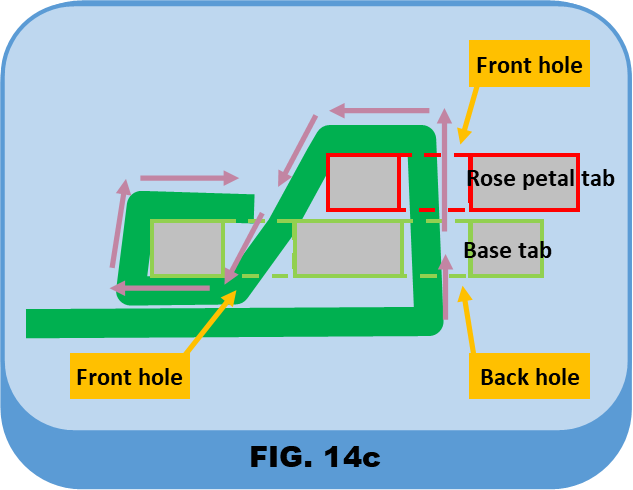
- Note: Each tab has two holes, a front and a back (FIG. 14c).
- Note: Study the figures beforehand to help understand the written directions (FIG. 14c).
- Refer to FIG. 14c to follow the path of the split section that will be inserted through the tabs of the flower head.
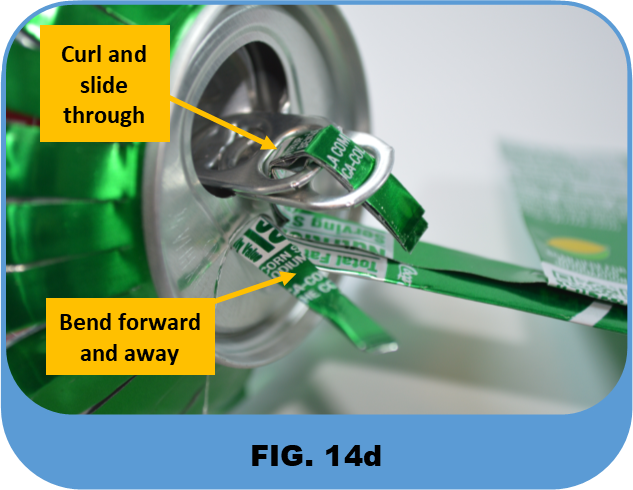
- Curl the split section before sliding it through the tabs. The other split section should be bent forward and outward at an angle so that it does not get snagged as you insert the curled section (FIG. 14d).
- Slide the curled split section up through the back hole of the base tab and then through the front hole of the rose petal tab (FIG. 14c and FIG. 14d).
- Curl the stem section back down the front hole of the base tab (FIG. 14c and FIG. 14d).
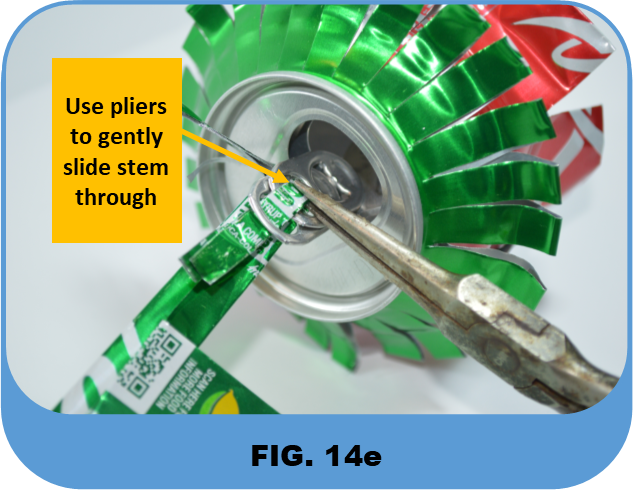
- Use the needle nose pliers to pull the stem gently through the tabs (FIG. 14e).
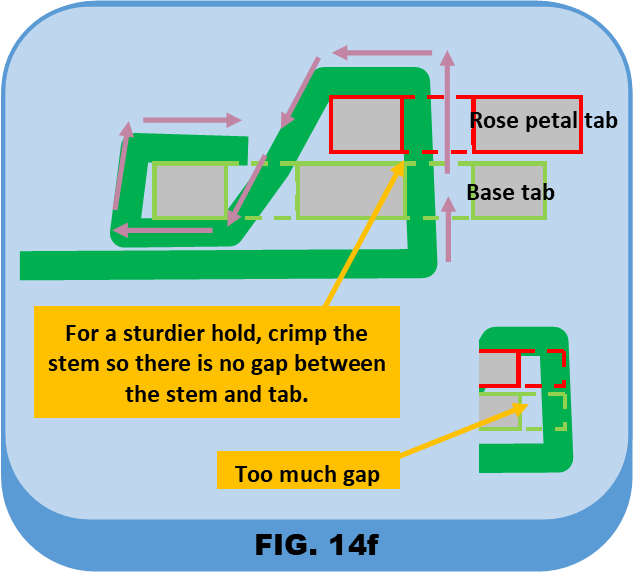
- For a sturdier hold, crimp the stem so there is no gap between the stem and the tab (FIG. 14f).
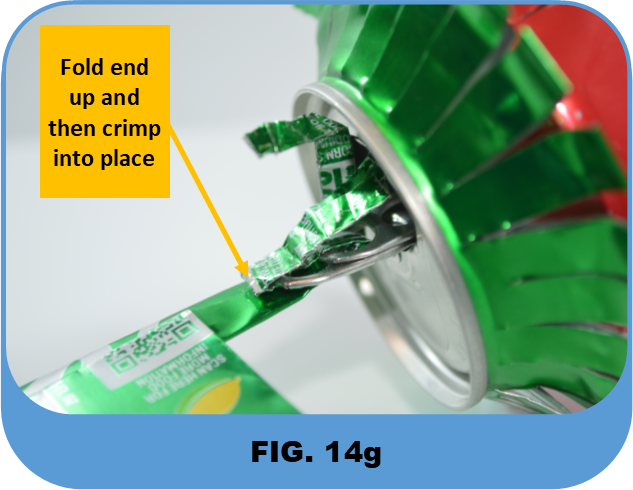
- Fold the end over the tabs and then crimp the end into place (FIG. 14g).
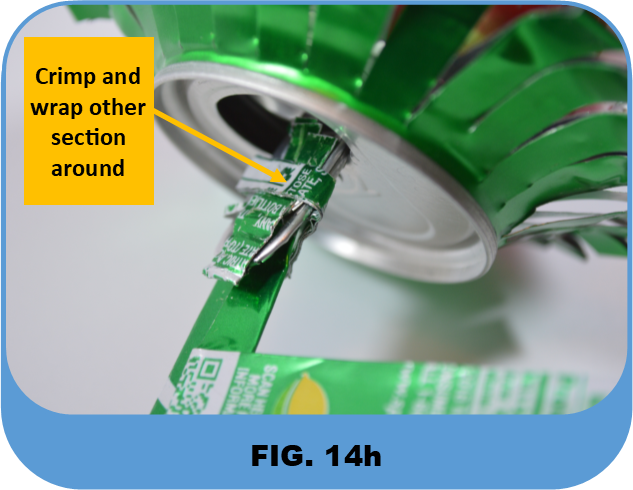
- Wrap and crimp the other split section around the tabs and around the split section that was previously crimped over into place (FIG. 14h).


Section 15b
Section 15a
Section 15
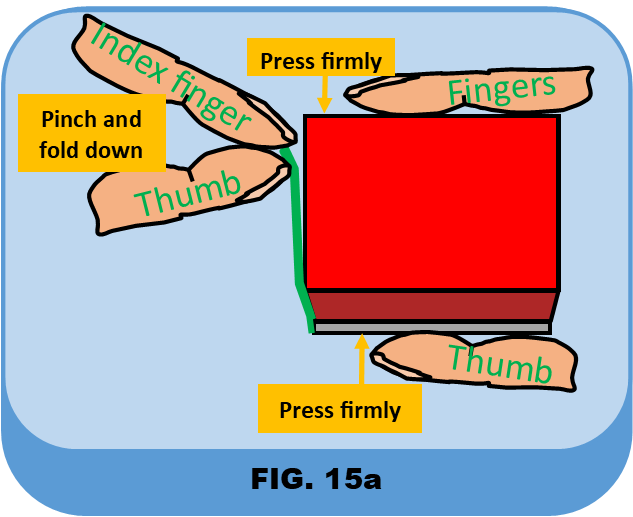
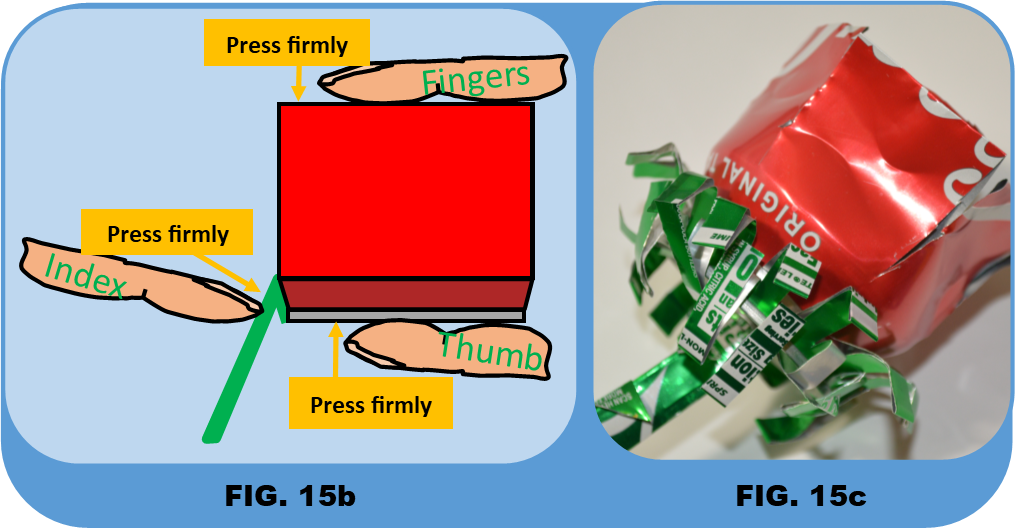
Shaping Flower Base Leaves
- While holding the flower heard firmly together, bend the base leaf down (FIG. 15a and 15b).
- Skip one base leaf and repeat procedure on next base leaf until you get all around the flower head (FIG. 15c).


Section 16b
Section 16a
Section 16
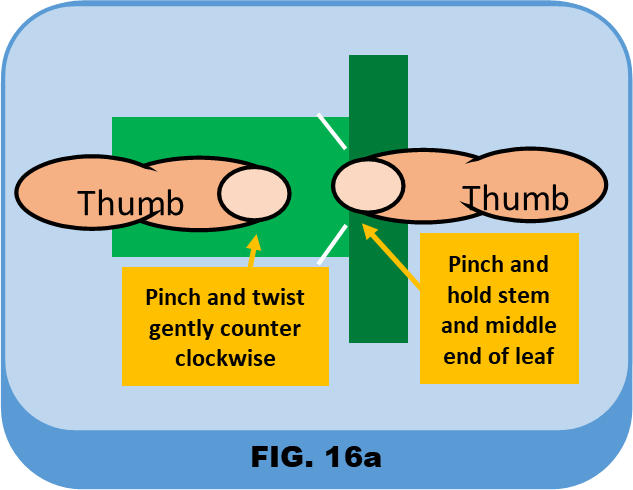
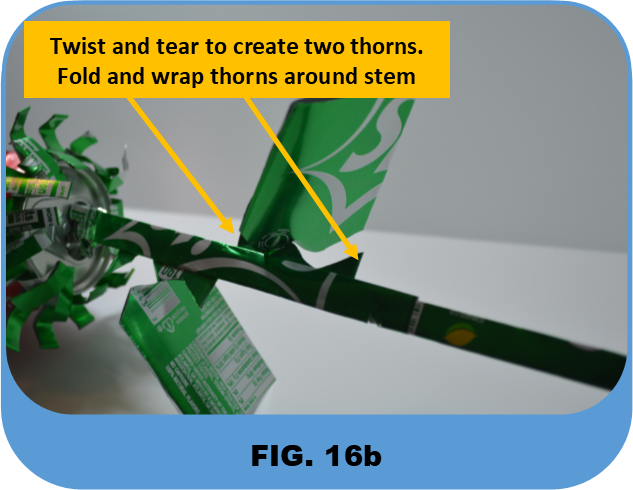
Shaping Stem Leaf
- On the top stem leaf, pinch and hold the stem and the edge of the leaf (FIG. 16a). With the other hand, pinch the leaf in the center but more towards the stem, then twist the leaf counter-clockwise (FIG 16a).
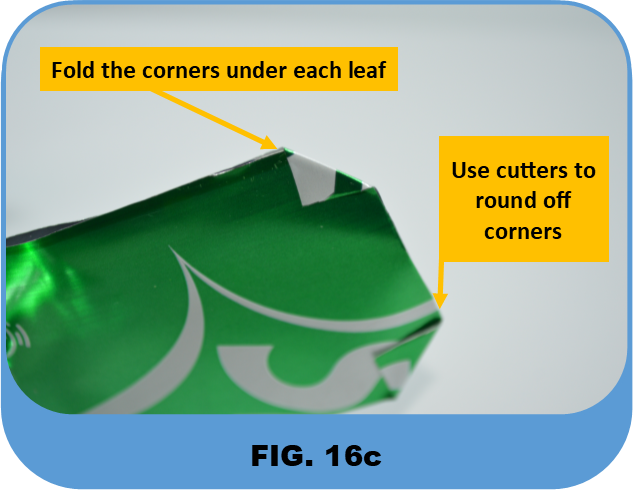
- The leaf will tear from the stem a bit and leave two thorns (FIG 16b).
- Repeat steps 1 and 2 on the other stem leaf.
- Fold and wrap the thorns around the stem. (FIG. 16b).


Finish b
Finish a

This guide book took some time to build. Any donation will be very much appreciated. Thank you.
end b
end a